Thursday, November 8, 2012

Post-It note holders

after posting some pictures on facebook of my post-it holders, i was asked to do a tutorial.  now i may have gone overboard on the instructions, but felt i'd better cover all the bases.  first off, i can't take full credit for the 'how to'.  forgive me, but i forgot to make a note of the lady who shared hers with instructions.  if it is 'you', i'll be happy to acknowledge you and give you credit.  meanwhile, i've added a few of my own instructions to step it up to 'my' liking. 

the finished holder.  (yeh, i'm a little backwards) 

with good quality heavy black cardstock, you can get 3 base holders from one 8 1/2" x 11" sheet.
base is: 7 1/2" x 3 1/4" 
scored at:  3 1/2" and 4"


choose your design and papers. i love graphic 45 papers.  everything co-ordinates and it makes it easy to pull together. but there are many 'kit's and pads that you can work with.  i'll probably move on to other styles one day, but for now, this just sets right with me.  i cut my mats at 3" x 3 3/4" with a 1/4" for the middle of the holder 'inside and out'.  not only does it look nice, but strengthens the whole thing as well.  you can mat again over this with a 2 3/4" by 3".  i didn't in this particular one, but in some of the pics of the other holders, you can see that i did!  
embellishing these are fun.  here, i used art philosophy to cut the flowers at default size. (i think it was 2 1/2")  use whatever you want.  buttons, bling, jewelry....whatever!


i make alot of my own chipboard.  this is just cardboard from boxes, cereal, whatever i can get my hands on....i save it all!  i just a couple to the thickness i want, glue together, then glue to the back of what i want 'popped up'. easy peasy.  just cut it a little smaller than what you're 'popping up'.


putting it together.  this is fun.  i ran into a problem where i didn't have the color bling to match my flower.  luckily, i had some acrylic paints.  (i think i had this for 2 yrs and the seal was still on it...lol) i had some martha stewart off white gems and i just stuck them on some scrap paper so i could dip them in the bottle of paint.  lordy, it was messy, and i worked right over my waste basket...it took me a few times of moving it around and heating it til i got it where i wanted it.  they're not as shiny as i'd like.  haven't figured out how to do that yet.  but i got the color i wanted.  yay me!  this is the first time i've done this!  i love it!  a little messy, but heck, you'll get a perfect match if you own all the colors...hahaha..oh brother!


now i don't know about you, but i don't and never have trusted the little sticky pads on the bottom of bling.  i've been taking mine off and using my scotch quick dry glue for yrs.  it can be a challenge, and i've  poked myself many times spilling my precious blood....'oh never mind'...just be careful.  the sticky pads don't stay sticky and they 'will' come off.  so this is why i take mine off and glue.

wow! my fingers look like a crafter.  


next, and lastly, just add a couple strips of glue.  i use my ATG gun. apply the post it squarely and up to the first scor-line so it's a snug, clean fit.  no gaps.  


there you have it.  i hope you make some and share your pics.  i'm always open for more ideas.  
thanks for visiting.  feel free to leave a comment.

oh...before i go, i want to show you some other post-it note holders i've made.  i hope they inspire you to make some.  


(((HUGS)))


Sunday, August 12, 2012

BABY SHOWER INVITATIONS

a couple friends and i, made these a couple of yrs ago and they were a 'hit'.  i've made these again a few times by myself, and made a template with my notes of instructions.  it's a 'good thing' the way i remember stuff anymore!  (we won't get into that!)

my son and daughter in law are expecting their first baby on thanksgiving of this year and i can't wait to start on the 'planning' with them.  first things first, are these invitations.  be wary, i'll be posting some more 'girly' stuff later on...but...for the invites, here it is!


the first thing you'll need to do if you want your information printed right on the inside..(i prefer), is if you have microsoft word, office, or a card designing software, print off what you want for 2 cards per 8 1/2" x 11" sheet of cardstock...this is your card base.  then you'll cut your base at 4 1/4" (this is half of your sheet).


i scored and folded at the halfway pt. which is 5 1/2" .  once folded, at the top of the card.  you need to mark the 'halfway' again, which is 2 1/8".  just a little dot to mark, then putting the top (fold side) into your punch half way and centering that dot....punch out.  this is your neck.


again, punch the corners by putting the 'corner' into the punch allowing the same clearance on both sides to give you your legs.


the template is a pc of cardboard, it is the exact same size as the card which is A-2, or 4 1/4''x 5 1/2''.  i notched the corners  1 3/4"x 1/2'.  this will mark your arms. with a straightedge and an exacto knife, i cut out the side of the onesie to the corner of the leg you've punched out. 


here is where you use your scallop punch.  i cut a circle in my pattern paper first, then center it in the scallop punch so it's equal all the way around.  cut in half and you use both halves... of course you'll need another because you need 3.  just use the other on the next card.


i've had these cuttlebug dies forever. i've made alot of cuts with these.  they're probably one of my 'most used' dies i have.  i love them!  using the same patterned paper, i cut another scalloped circle with white cardstock circle in the center.  embossed with swiss dots folder, then pop dotted the little elephant in the center.  also i bordered the sleeves with the punch you see in the background.  i don't know the name of this one but it's from 'STAMPIN UP'. 

i need to go shopping for some baby buttons.  i know i have some around here somewhere, but do ya think i can find them?  (sigh)...there i go again, not remembering stuff!  i hope you enjoyed this and let me know if you make some.  i'd love to see your pics.  thanks all!  stay tuned for some more 'baby girl stuff' in the near future!

(((HUGS)))

Friday, July 6, 2012

FREEDOM

just a quick post to show you the banner i made for our 'FREEDOM FESTIVAL' crafts fair.  i used 'QUARTER NOTE' cricut cartridge, and TIM HOLTZ  mini paper roseetes.


(((hugs)))

Saturday, June 23, 2012

I'VE GONE GREEN!

i've been a greenie for many years doing this and that to save the planet and reduce my carbon footprint.  here's just one small token of my appreciation to my planet earth.  this goes with me everywhere i go.  


i hope you can do you share of 'saving the planet'.
every little bit helps!

(((hugs)))


Thursday, June 7, 2012

ANCESTRY


using 3 carts, ANCESTRY, ELEGANT EDGES and GEORGE.  the papers chosen are from CTMH - FLORENTINE. flower is punched with PAPER SHAPERS 6 petal flower, and MCGILL giant sun punch. bling is ZVA-CREATIVE. inking with RANGER distressed inks-WEATHERED WOOD. adhesives, SCOTCH QUIK-DRY, and SCOTCH ATG.

the frames were from  elegant edges, then i brought over an oval from george and centered it within the the frame so you could slide your photo in behind.  it looks like i could have centered the one on the left a little better...but, i guess, it is what it is now!  i also cut the border 3 times at 9'' in lenth, which is the length of the mat behind the silouettes.  there are two behind there, back to back, and it just so happened the 3 silouettes matched up perfectly in the largest part of the border...love when accidents like this happen!  then of course i place the 3rd border on the bottom, laced it with some lace ribbon i had, and made the flower by punching two flowers, glueing, then punched the sunflower, glued to the center, then added matching bling for the center of the flower.  the same bling i used for the picture frames.  ancestry is cut twice, and offset to give it a shadow effect, as heritage doesn't give you a shadow for this cut.  

i hope you like.  thanks for stopping by.

(((hugs)))

Sunday, May 27, 2012

TBBM PURSE TUTORIAL

the first 3 images are on my gypsy so you can see how i get two purses at a time and the measurements i used
i used the 'shift lock' to get the 'hole' feature.  i don't care for the slotted holes at all! 
but that 'is' optional.


the next 2 images are the scoring.  it is important to match up the scores with the folds so the purse will 'square up'.


tags bags boxes and more does not have a layering feature.  it's in my 2nd nature to layer, layer, layer, so this is how 'I' do it.  after you've chosen your papers for the flap and front, flip both....(important) upside down so they will match.  the 3 scallops on the flap are not equal, so if you don't flip both, the purse 'and' the paper, it WILL NOT MATCH UP! trace your flap up to the fold, then trim 1/8" off all sides. doing  the same for the front of the purse (and make sure its the front....and not back...(like i've done). i use different papers just cause i like the looks.


glue them on now before you assemble. also, i cut a strip for the top to reinforce our little gal.  and it also makes it look a little classy 'i think'.


glue on and around the holes.  flip this over and with a hole punch relatively close to the size of the holes, line up the holes and punch through.


now lets begin putting it together.  i use scor tape. it's the best for holding things like this that will get 'used'. i forgot to take a picture.  there are only 2 flaps on each side.  when adhering....a 3rd hand would be nice, however that isn't an option for me. i stick the long edges first and don't even take off the protective layer of tape from the short edges..(not just yet).  just stick the long edges  it's important to line up before adhering. once it's stuck, it's 'STUCK'. once you get them together, reach in the bottom, and gently grab that protective tape layer and pull it off, line up so it's straight and stick it.  i use something long to get inside the purse to push the flap down tighter. 


see that little 'extra' at the top?  depending on how you score.  you'll probably get that.  i do!  quite often!  i don't like it, so i trim it off.  that way, the top fits down flat and it looks much neater.  careful, don't trim too much!


flip the purse sideways and punch two small 1/16" holes for the tag.


holding your flap down, mark a little spot where you'll put a small hole for a brad.  this is how i close my purses.  i've tried magnets...phishh, wasted my money! i've tried velcro...yikes, (you have to open/close these alot, you'll rip), so this is the best way 'I'VE' found, that works for me.  i choose a flower that i can put a brad into the center.  then go through the front and into, the purse. i'll let you figure out how to open them little buggers from the inside...you'll get it!  once you got your 'whatever' on the front, tuck your flap under and there ya go!  add your tag, your ribbon and you got a purse!  

do, be careful when poking that hole in.  i support the inside with my hand.  you 'can' do this before you glue it together.  as long as you fold it over and know where the bottom of your purse flap is. 


that's it.  i hope i didn't confuse you...you know where to find me if you have questions. 

please leave me a comment.  thanks!

(((hugs)))


Saturday, April 28, 2012

RIBBON STORAGE


i get this craft catalog, oh heck, i get lots of them, and love browsing through for ideas.  i've always wished i had been an engineer or somebody who designs.  although i can make my own take on other peoples ideas, sometimes i come up with a brainstorm of an idea...well, today IS NOT THAT DAY!  haha, gotcha there!  but i've been wanting to make more room in my 'playroom', not because i want to buy more stuff, but because i'm frustrated at not seeing what i have and 'it' being forgotten and not used.  (out of sight, out of mind)  i'm amazed at what i've accumulated throughout the years since i started crafting.  i come across stuff i just had to have, but have no idea what for!  that happen to you?  RIBBON!  i have ribbon coming out of my ears.  in this box, in that box, on a shelf, in drawers,  here, there and everywhere.  i think i have an obsession with ribbon!
back to that catalog....i see these ribbon rings and for $9.99 i can get 1 metal ring and 15 tags to hold them.  for a better deal, you get 3 jumbo ribbon ring sets for $26.89
ok, i already have a fortune in what i own now, i don't need to mortgage my house to pay to store all this....stuff!  i would show you a picture of what they're selling, but i don't want to get in trouble with 'enfringement rights' and all that 'legal' stuff. but you'll get the idea when you see the pics of what i made.

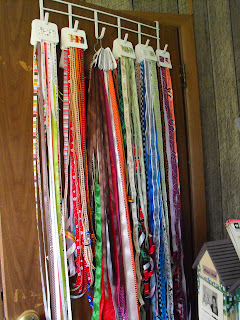
this is where i was storing my ribbon.


using GEORGE cartridge and my years of storing cardboard box liners and the cardboard 12"x12" that comes in STAMPIN UP's pattern papers kits...(don't throw them out for heaven sakes) this is what i used to make these.


are you starting to get the idea?  i need a whole lot more than just these few, also i altered them and made more to the various sized ribbon i have.  i still need to make one for the skinny little fellers.  but sharing this, i hope i've inspired you to make your own. if you have a closet in your room or like this $1 over the door  hanger i found at a garage sale, try this.  if you don't have GEORGE, there are other carts with squares, rectangles and circles you can use to make these.  check what you have.  makes me wish i had another door to hang more...lol, that ain't gonna happen!


i'm pleased to 'free up' some desperately needed space and use an area that i call, 'wasted space'. 
...and i'm not finished yet!

this is gonna work for me!  i hope you give it a try.  easy peasey, nice and easy!

(((hugs)))